
| 일 | 월 | 화 | 수 | 목 | 금 | 토 |
|---|---|---|---|---|---|---|
| 1 | 2 | 3 | 4 | 5 | 6 | |
| 7 | 8 | 9 | 10 | 11 | 12 | 13 |
| 14 | 15 | 16 | 17 | 18 | 19 | 20 |
| 21 | 22 | 23 | 24 | 25 | 26 | 27 |
| 28 | 29 | 30 | 31 |
- Linux
- Spring
- 배열스트링
- template
- git
- hikaricp
- hikari
- between date
- 라즈베리파이
- log4j profile
- between 날짜
- springboot
- mybatis
- datasource
- oracle between
- ORACLE CLOUD
- Gradle
- Spring Security
- python 개발환경
- Java
- github
- bitbucket
- catalina log
- Spring Boot
- ubuntu
- intellij
- STS
- log4j2
- oracle
- MySQL
- Today
- Total
파워노트
Spring boot Security ( api server 기반 ) 본문
* 스프링 에서의 Security 는 상당히 중요한 부분이다.
* 나름대로 이부분에 대한 정리 사항들을 하려 한다.
1. Spring boot project 생성.
일반적인 프로젝트를 생성한다.
2.SecurityConfig class 생성.
Security 를 위해 WebSecurityConfigurerAdapter 를 상속받은 Security Config Class를 생성한다.
@Configuration
@EnableWebSecurity
public class SecurityConfig extends WebSecurityConfigurerAdapter {
    @Bean
    public PasswordEncoder passwordEncoder() {
        return new BCryptPasswordEncoder();
    }

    @Bean
    @Override
    public AuthenticationManager authenticationManagerBean() throws Exception {
        return super.authenticationManagerBean();
    }

    @Override
    public void configure(WebSecurity web) {
    }

    @Override
    public void configure(AuthenticationManagerBuilder auth) throws Exception {
        auth.inMemoryAuthentication().withUser("user1").password( passwordEncoder().encode("password1") ).roles("USER", "ADMIN");
    }

    /* @formatter:off */
    @Override
    protected void configure(HttpSecurity http) throws Exception {
 		http
 			.httpBasic().disable()      // Http basic Auth  기반으로 로그인 인증창이 뜸.  disable 시에 인증창 뜨지 않음.
 				.csrf().disable()       // rest api이므로 csrf 보안이 필요없으므로 disable처리.
	 			.sessionManagement().sessionCreationPolicy(SessionCreationPolicy.STATELESS)  // jwt token으로 인증하므로 stateless 하도록 처리.
 			.and()
	 			.authorizeRequests()
					.antMatchers("/login").permitAll()
	 				.antMatchers("/hello2").authenticated()  // 인증권한이 필요한 페이지.
	 				.anyRequest().permitAll()     // 나머지 모든 요청 허용  ( 생략 가능 )
 			;
	}
	/* @formatter:on */
}- 추후 DB 등을 통한 처리를 해야 하나 임의의 테스트편의를 위해 메모리의 user정보를 가지고 구현.
- Security의 설정중 가장핵심이 http 에 대한 권한과 인가에 대한 설정에 대해 알아보자.
- httpBasic() : Http basic Auth 기반으로 로그인 인증창이 뜸. 기본 인증 로그인을 이용하지 않으면 disable
- csrf() : html tag 를 통한 공격 ( api 서버 이용시 disable() )
- .sessionManagement().sessionCreationPolicy(SessionCreationPolicy.STATELESS) : STATELESS 는 인증 정보를 서버에 담아 두지 않는다.
전통적인 ip/pw 방식의 폼로그인 처럼 로그인 한 이후 로그인 정보를 서버에서 관리 하여 세션에 담아 두었다가 이후 다음 인터페이스를 호출시 로그인된 정보를 기반으로 처리가 가능하다.
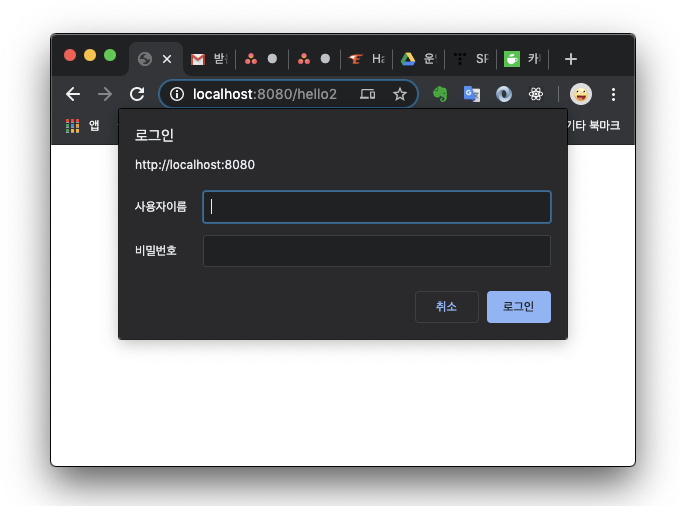
서버 코드 측면에서는 폼로그인 기반에서는 /login 경로를 통해 로그인 이후 권한이 필요한 페이지인 /hello2 를 호출하면 hello2 의 response가 정상적으로 리턴된다.
** Security config
//	 		.sessionManagement().sessionCreationPolicy(SessionCreationPolicy.STATELESS)  // jwt token으로 인증하므로 stateless 하도록 처리.
// 			.and()


** hello2 response
hello2
그러나 STATELESS 상태에서는 기존 로그인 이후 해당정보를 서버에서 관리 하지 않기에
/login 경로를 통해 로그인 이후 권한이 필요한 페이지인 /hello2 를 호출하면 403 에러가 발생한다.
( SecurityContextHolder.getContext().getAuthentication() 정보가 null 로 되어 있음 기존 정보를 가지고 있지 않음 )
** hello2 response
{
    "timestamp": "2020-04-16T05:10:59.685+0000",
    "status": 403,
    "error": "Forbidden",
    "message": "Access Denied",
    "path": "/hello2"
}
- .authorizeRequests() : 각 경로 path 별 권한 처리
'spring boot' 카테고리의 다른 글
| [spring] 비동기 처리 정리. (0) | 2021.04.22 |
|---|---|
| [JPA] 양방향 연관관계시 주의.. (0) | 2020.08.04 |
| [intelij] spring boot 프로젝트 생성하기 (0) | 2020.06.13 |
| Security Filter (2) | 2020.04.17 |
| UserDetailService (0) | 2020.04.17 |

