| 일 | 월 | 화 | 수 | 목 | 금 | 토 |
|---|---|---|---|---|---|---|
| 1 | 2 | 3 | 4 | 5 | 6 | 7 |
| 8 | 9 | 10 | 11 | 12 | 13 | 14 |
| 15 | 16 | 17 | 18 | 19 | 20 | 21 |
| 22 | 23 | 24 | 25 | 26 | 27 | 28 |
Tags
- ubuntu
- datasource
- springboot
- git
- oracle
- 배열스트링
- Spring Boot
- python 개발환경
- log4j profile
- Spring
- 라즈베리파이
- mybatis
- github
- bitbucket
- oracle between
- intellij
- template
- Gradle
- between date
- Linux
- catalina log
- hikaricp
- MySQL
- ORACLE CLOUD
- log4j2
- STS
- Java
- hikari
- Spring Security
- between 날짜
Archives
- Today
- Total
반응형
| 일 | 월 | 화 | 수 | 목 | 금 | 토 |
|---|---|---|---|---|---|---|
| 1 | 2 | 3 | 4 | 5 | 6 | 7 |
| 8 | 9 | 10 | 11 | 12 | 13 | 14 |
| 15 | 16 | 17 | 18 | 19 | 20 | 21 |
| 22 | 23 | 24 | 25 | 26 | 27 | 28 |
Tags
- ubuntu
- datasource
- springboot
- git
- oracle
- 배열스트링
- Spring Boot
- python 개발환경
- log4j profile
- Spring
- 라즈베리파이
- mybatis
- github
- bitbucket
- oracle between
- intellij
- template
- Gradle
- between date
- Linux
- catalina log
- hikaricp
- MySQL
- ORACLE CLOUD
- log4j2
- STS
- Java
- hikari
- Spring Security
- between 날짜
Archives
- Today
- Total
파워노트
[ubuntu] mysql 설치 본문
반응형
# 버전확인
ubuntu@ubuntu:~$ lsb_release -a
No LSB modules are available.
Distributor ID: Ubuntu
Description:    Ubuntu 18.04.4 LTS
Release:        18.04
Codename:       bionic
# mysql 설치
ubuntu@ubuntu:~$ sudo apt-get update
---
ubuntu@ubuntu:~$ sudo apt-get install mysql-server-5.7
---
설치 과장 진행. Y 입력.
---
# mysql 설치 확인
ubuntu@ubuntu:~$ apt --installed list | grep mysql
# mysql service 실행
ubuntu@ubuntu:~$ service mysql start
==== AUTHENTICATING FOR org.freedesktop.systemd1.manage-units ===
Authentication is required to start 'mysql.service'.
Authenticating as: Ubuntu (ubuntu)
Password:
==== AUTHENTICATION COMPLETE ===
ubuntu@ubuntu:~$ ps -ef | grep mysql
mysql     4563     1  0 03:50 ?        00:00:00 /usr/sbin/mysqld --daemonize --pid-file=/run/mysqld/mysqld.pid
# mysql root 접속
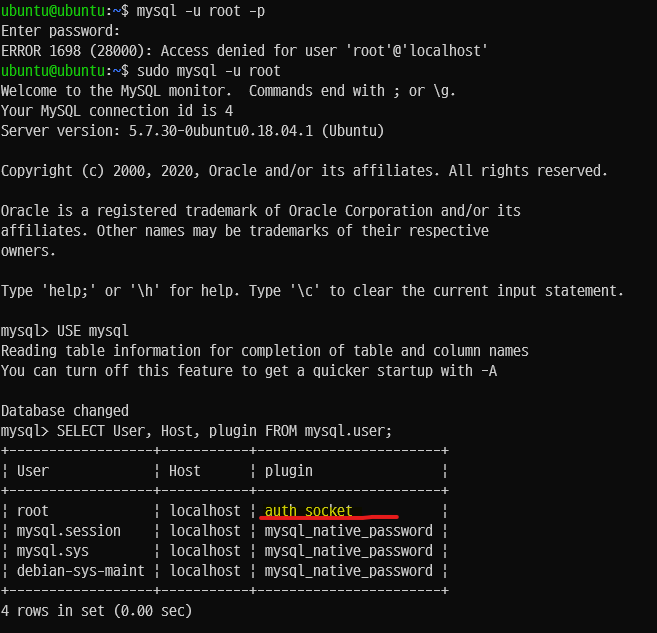
$ mysql -u root -p 으로 로그인 시도를하면
'ERROR 1698 (28000): Access denied for user 'root'@'localhost'이라는 에러를 발생할때가 있다.
- 이는 root 계정이 authsocket 으로 처리 되어있기 때문이다.
- sudo mysql -u root # sudo를 사용하여 root계정으로 mysql에 접속한다.

- id / passwd 방식으로의 처리를 위해 로 접속하여 비밀번호 방식을 바꿔준다.
mysql> update user set plugin='mysql_native_password' where user='root';
Query OK, 1 row affected (0.00 sec)
Rows matched: 1  Changed: 1  Warnings: 0

mysql> flush privileges;
Query OK, 0 rows affected (0.00 sec)

mysql> select user, host, plugin from user;
+------------------+-----------+-----------------------+
| user             | host      | plugin                |
+------------------+-----------+-----------------------+
| root             | localhost | mysql_native_password |
| mysql.session    | localhost | mysql_native_password |
| mysql.sys        | localhost | mysql_native_password |
| debian-sys-maint | localhost | mysql_native_password |
+------------------+-----------+-----------------------+
4 rows in set (0.00 sec)

mysql> exit
Bye
- mysql_native_password 으로 변경되었으므로 재접속을 시도해 본다.
ubuntu@ubuntu:~$ mysql -u root -p
Enter password:
Welcome to the MySQL monitor.  Commands end with ; or \g.
Your MySQL connection id is 5
Server version: 5.7.30-0ubuntu0.18.04.1 (Ubuntu)

Copyright (c) 2000, 2020, Oracle and/or its affiliates. All rights reserved.

Oracle is a registered trademark of Oracle Corporation and/or its
affiliates. Other names may be trademarks of their respective
owners.

Type 'help;' or '\h' for help. Type '\c' to clear the current input statement.

mysql>
# root 비밀번호 변경
mysql> show databases;
+--------------------+
| Database           |
+--------------------+
| information_schema |
| mysql              |
| performance_schema |
| sys                |
+--------------------+
4 rows in set (0.00 sec)

mysql> use mysql
Reading table information for completion of table and column names
You can turn off this feature to get a quicker startup with -A

Database changed

mysql> alter user 'root'@'localhost' identified with mysql_native_password by 'mypassword123';

mysql> flush privileges;
Query OK, 0 rows affected (0.00 sec)
# mysql 제거 : 혹시라도 제거할 일이 생긴다면.. ^^
ubuntu@ubuntu:~$ apt --installed list | grep mysql
ubuntu@ubuntu:~$ sudo apt-get purge mysql-server
ubuntu@ubuntu:~$ sudo apt-get purge mysql-common
ubuntu@ubuntu:~$ sudo apt-get purge mysql-server-core-5.7
ubuntu@ubuntu:~$ sudo apt-get purge mysql-client-core-5.7

## 제거 이후 설치 패키지 확인
ubuntu@ubuntu:~$ apt --installed list | grep mysql


## 파일이 남아 있다면 제거
sudo rm -rf /var/log/mysql
sudo rm -rf /var/log/mysql.*
sudo rm -rf /var/lib/mysql
sudo rm -rf /etc/mysql
반응형
'Linux' 카테고리의 다른 글
| VI Editor 필살기 (0) | 2021.04.05 |
|---|---|
| [경고] 원격 호스트 식별이 변경되었습니다! (0) | 2021.02.10 |
| 리눅스 Java 프로세스 모두 죽이기. (0) | 2020.07.28 |
| windows 10 wsl ubuntu 설치 하기. (5) | 2020.07.11 |
| [ubuntu] java 설치 하기 (0) | 2020.07.09 |
Comments

